Scrolling LCD 16 * 2 display with ARDUINO UNO

Hey guys, here we learn about something lcd display and how to coding that display.
what is LCD ?
LCD stands for liquid crystal display These are commonly used in the screen industries to replace the utilization of CRTs. Cathode Ray Tubes use huge power when compared with LCDs, and CRTs heavier as well as bigger. These devices are thinner as well power consumption is extremely less. The LCD 16×2 working principle is, it blocks the light rather than dissipate. This article discusses an overview of LCD 16X2, pin configuration and its working.
LCD 16×2 Pin Diagram

- Pin1 (Ground/Source Pin): This is a GND pin of display, used to connect the GND terminal of the microcontroller unit or power source.
- Pin2 (VCC/Source Pin): This is the voltage supply pin of the display, used to connect the supply pin of the power source.
- Pin3 (V0/VEE/Control Pin): This pin regulates the difference of the display, used to connect a changeable POT that can supply 0 to 5V.
- Pin4 (Register Select/Control Pin): This pin toggles among command or data register, used to connect a microcontroller unit pin and obtains either 0 or 1(0 = data mode, and 1 = command mode).
- Pin5 (Read/Write/Control Pin): This pin toggles the display among the read or writes operation, and it is connected to a microcontroller unit pin to get either 0 or 1 (0 = Write Operation, and 1 = Read Operation).
- Pin 6 (Enable/Control Pin): This pin should be held high to execute Read/Write process, and it is connected to the microcontroller unit & constantly held high.
- Pins 7-14 (Data Pins): These pins are used to send data to the display. These pins are connected in two-wire modes like 4-wire mode and 8-wire mode. In 4-wire mode, only four pins are connected to the microcontroller unit like 0 to 3, whereas in 8-wire mode, 8-pins are connected to microcontroller unit like 0 to 7.
- Pin15 (+ve pin of the LED): This pin is connected to +5V
- Pin 16 (-ve pin of the LED): This pin is connected to GND.
Connection of 16 x 2 LCD with ARDUINO UNO
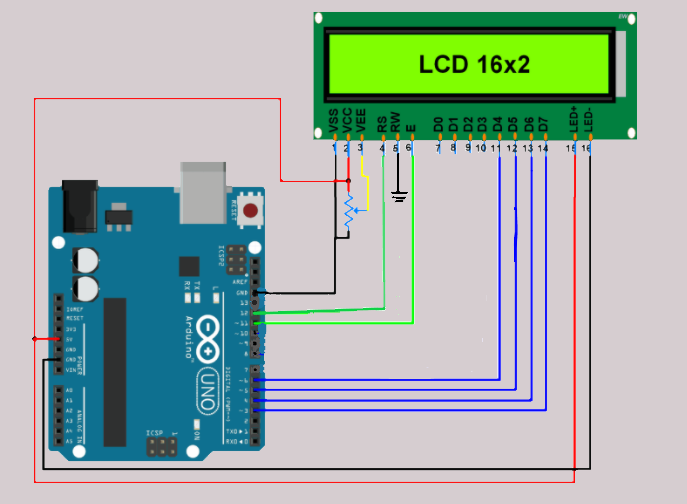
Hey guys , Here we show a connection of Lcd display with Arduino UNO .
1.) VSS :- GND.
2.) VCC :- 5V.
3.) VEE :- Connected to potentiometer.
4.) RS :- 11 , E :-12 , RW :- GND
5.) D4 to D7 :- Pin no. 3 to 6 of ARDUINO UNO.
6.) A :- +5V.
7.) K:- GND.
After done connection now we have go for software working. after completing your hardware work we have upload code to the ARUINO UNO . for see how we upload a code u can go for this link
Code for Scrolling Display
/*
LiquidCrystal Library - scrollDisplayLeft() and scrollDisplayRight()
Demonstrates the use a 16x2 LCD display. The LiquidCrystal
library works with all LCD displays that are compatible with the
Hitachi HD44780 driver. There are many of them out there, and you
can usually tell them by the 16-pin interface.
This sketch prints "Hello World!" to the LCD and uses the
scrollDisplayLeft() and scrollDisplayRight() methods to scroll
the text.
The circuit:
* LCD RS pin to digital pin 12
* LCD Enable pin to digital pin 11
* LCD D4 pin to digital pin 6
* LCD D5 pin to digital pin 5
* LCD D6 pin to digital pin 4
* LCD D7 pin to digital pin 3
* LCD R/W pin to ground
* ends to +5V and ground
*/
// include the library code:
#include <LiquidCrystal.h>
// initialize the library by associating any needed LCD interface pin
// with the arduino pin number it is connected to
const int rs = 12, en = 11, d4 = 6, d5 = 5, d6 = 4, d7 = 3;
LiquidCrystal lcd(rs, en, d4, d5, d6, d7);
void setup() {
// set up the LCD's number of columns and rows:
lcd.begin(16, 2);
// Print a message to the LCD.
lcd.print("hello, world!");
delay(1000);
}
void loop() {
// scroll 13 positions (string length) to the left
// to move it offscreen left:
for (int positionCounter = 0; positionCounter < 13; positionCounter++) {
// scroll one position left:
lcd.scrollDisplayLeft();
// wait a bit:
delay(150);
}
// scroll 29 positions (string length + display length) to the right
// to move it offscreen right:
for (int positionCounter = 0; positionCounter < 29; positionCounter++) {
// scroll one position right:
lcd.scrollDisplayRight();
// wait a bit:
delay(150);
}
// scroll 16 positions (display length + string length) to the left
// to move it back to center:
for (int positionCounter = 0; positionCounter < 16; positionCounter++) {
// scroll one position left:
lcd.scrollDisplayLeft();
// wait a bit:
delay(150);
}
// delay at the end of the full loop:
delay(1000);
}
for any query Email to Innovativethnings@gmail.com


Comments
Post a Comment